Lodge a new declaration
There are several ways to lodge a customs declaration:
- create a completely new declaration
- use a template (see the sections “Declaration lists” and “Summary and submission”)
- complete a declaration saved as a draft (see the section “Declaration lists”)
- copy the details of an earlier declaration as a draft (see the section “Summary and submission”).
Here are the instructions for creating a completely new declaration.
New declaration
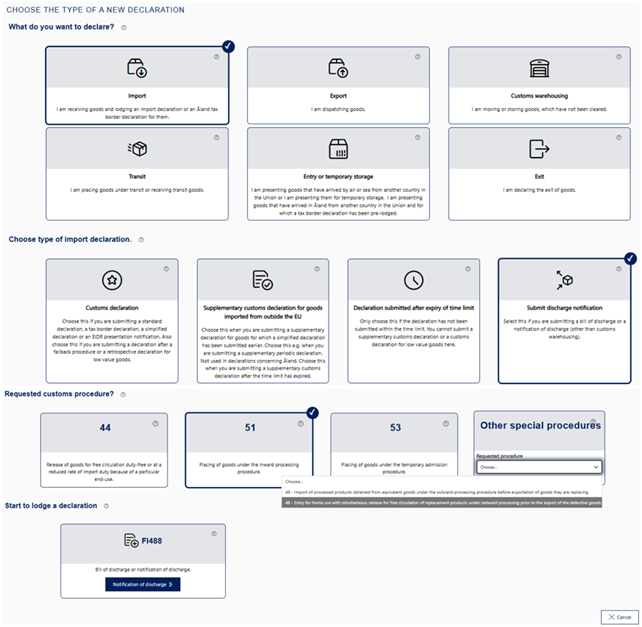
You can create a completely new declaration by clicking on “+ New declaration” on the front page. Then choose the declaration you wish to lodge.
Choose the declaration you wish to lodge
Under “Choose the type of a new declaration”, you start by choosing whether you wish to lodge a declaration for import, export, customs warehousing, transit, entry, temporary storage or exit. You can`t submit declarations for centralised import clearance in this service. Choose
- “Import” if you wish to lodge standard or two-stage import declarations for goods imported from outside the EU or customs declarations for special procedures.
- “Import” if you wish to lodge a declaration for goods imported across the Åland tax border or some other tax border, e.g. a recapitulative statement for customers with a tax border number or a tax border declaration for a single consignment.
- “Import” if you wish to submit a discharge notification, that is, a bill of discharge or a notification of discharge (other than customs warehousing).
- “Export” if you wish to lodge standard or two-stage export declarations when you send goods outside the EU. Choose this also when you are lodging a ship supply declaration or send goods across the tax border e.g. to the Canary Islands or from the Åland Islands to another EU country.
- “Customs warehousing” if you wish to lodge customs warehousing declarations.
- “Transit” if you wish to lodge transit declarations.
- “Entry or temporary storage”, if you wish to lodge declarations for entry or temporary storage.
- "Exit" if you wish to lodge exit declarations.
Read more detailed guidance under “Import declarations”, “Export declarations”, “Customs warehousing declarations”, “Entry and temporary storage declarations” ,“Transit declarations” and “Exit declarations”.

The following alternatives will be displayed based on your earlier choices.
If you directly wish to choose a declaration type that you have used before, you can choose it in the dropdown menu under “Shortcuts”.
Clicking on “Close” will delete all the choices you have made and you will return to the front page of the service.
Import declarations
When you have chosen “Import”, you’ll have to specify what kind of declaration you wish to lodge. The alternatives will be displayed based on your earlier choices. Read the detailed guidance below.
Choosing the declaration type
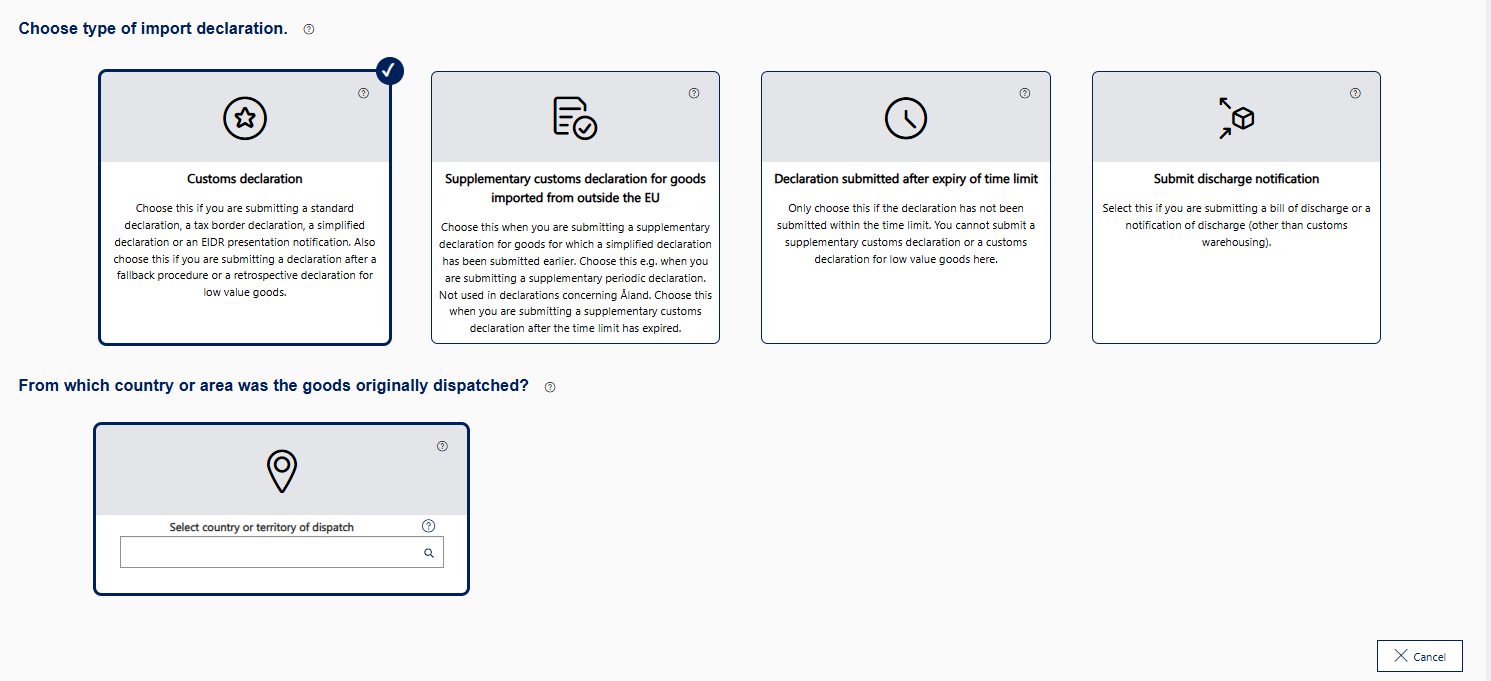
Next, choose the type of import declaration. The customs procedure will be chosen later.
Choose “Customs declaration”, if you are lodging one of the following declarations:
- standard customs declaration
- simplified customs declaration
- tax border declaration
- declarations” on the page “New declaration”.
Recapitulative statement for customers with a tax border number - EIDR presentation notification
- a declaration after a fallback procedure
- a customs declaration for low value goods.
Choose “Supplementary customs declaration”, when you are lodging a supplementary declaration to a presentation notification or a simplified declaration. Choose this even if you are lodging a supplementary customs declaration after the time limit has expired. When you have chosen a supplementary declaration, you will move to a declaration list with declarations for which a supplementary customs declaration has not yet been lodged. From the list, choose the declaration for which you wish to lodge a supplementary declaration. A supplementary customs declaration can also be lodged for a period as a recapitulative declaration, in which case it will be lodged for more than one simplified customs declaration or presentation notification at the same time. (For more detailed guidance, see “Supplementary customs declaration” on this page”.)
Choose “Declaration submitted after expiry of time limit”, if the customs declaration has not been lodged when it should have, that is, if you have received undeclared goods. In that case, the service automatically fills in the additional declaration type required for retrospective declarations. Please note that if you are lodging a supplementary declaration after the time limit has expired, don’t choose this. Instead, choose “Supplementary customs declaration”.
Choose “Discharge notification” when you are submitting a notification of discharge of a special procedure other than customs warehousing. It must be submitted for the customs procedures 44, 46, 48, 51 and 53.
Choosing the country of dispatch
Next, select the original country of dispatch for the goods. Select the country code for the country of dispatch in the drop-down menu “Select country or territory of dispatch”. You can open a list where you can search and select the country of dispatch. You can also write the beginning of the name of the country or territory (e.g. Chi for China) in the field, and the menu will display the alternatives containing that combination of letters.
If you are lodging an import declaration for goods imported from a non-EU country, select the country of dispatch from the menu, e.g. CN China. If you are lodging a tax border declaration for goods imported from Sweden to Åland, select SE Sweden. If you are lodging a tax border declaration concerning goods traffic between Åland and mainland Finland, select FI Finland (for more detailed guidance, see the section “Åland tax border declarations” on this page).
The selection of country of origin affects the details that you will have to provide next.
Choosing the customs procedure
If you have chosen “Customs declaration”, the next step is to choose the customs procedure you wish to use.
When you have chosen the customs declaration, there are separate buttons for the three most common procedures, which you can click on directly to choose the procedure. You can choose other customs procedures, such as special procedures, from the drop-down menu under “Special procedures and other customs procedures”.

By choosing “4000” you can lodge a customs declaration for goods to be released for free circulation without a previous customs procedure. Choose “4000” also when you are lodging a customs declaration for a low-value consignment worth less than 150 euros. (For more detailed guidance, see “Import declaration for low-value goods (customs procedure 4000)”.)
If you choose “40 – Release for free circulation”, you can lodge customs declarations for the procedure 40 (release for free circulation), where goods imported from outside the EU are customs cleared and released for use. (For more detailed guidance, see “Release for free circulation (customs procedures 07, 40, 42, 45, 61, 63, 68)” on this page).
If you choose “61 – Re-import and release for free circulation”, you can lodge customs declarations for the procedure 61, where goods temporarily exported from the EU return to the EU. (For more detailed guidance, see “Release for free circulation (customs procedures 07, 40, 42, 45, 61, 63, 68)” on this page).
In customs declarations concerning goods traffic between Åland and mainland Finland as well as in customs declarations for goods imported from another EU country to Åland, you can choose the customs procedure “40 – Release for free circulation” or “61 – Re-import and release for free circulation”. (For more detailed guidance, see the section “Åland tax border declarations” on this page).
If you choose “Special procedures and other customs procedures”, you can lodge customs declarations for other customs procedures, such as:
- “07 – Release of goods for free circulation simultaneously placed under a warehousing procedure” – a procedure where the goods are moved e.g. to a tax warehouse
- ”42 – Release for free circulation and home use of goods exempt from VAT to another Member State” – a procedure where import is followed by intra-Community trade to another Member State
- ”44 – End-use authorisation” – a procedure where the goods are used for a specific use
- “45 – Release of goods for free circulation and partial entry for home use for either VAT or excise duties and their placing in a warehouse other than customs warehouses” – a procedure where the goods are moved e.g. to an excise warehouse
- ”46 – Import of processed products obtained from equivalent goods under the outward-processing procedure before exportation of goods they are replacing” – a procedure where equivalent goods are used
- The use of the procedure always requires a written authorisation granted by the Customs Authorisation Centre.
- ”48 – Entry for home use with simultaneous release for free circulation of replacement products under outward processing prior to the export of the defective goods” – standard exchange where replacement goods are used
- ”51 – Inward processing” – a procedure where the goods are e.g. repaired
- ”51 – Temporary admission” – temporary admission of goods e.g. for an exhibition
- ”63 – Re-importation with simultaneous release for free circulation” – a procedure where temporarily exported goods return to another Union country.
If you notice that you have selected the wrong customs procedure when you are already completing the declaration, you can no longer change the declaration type. You have to stop completing the declaration and start a new declaration.
Entering an arrival ID
Based on your earlier choices, the following field may be displayed in the service: “If you have an arrival ID from postal or freight operator, enter it here before selecting a declaration”. If you are completing a customs declaration for a postal consignment or other consignment for which you have received an arrival ID or other tracking ID, it is important that you enter the ID here. The service will then automatically complete some of the declaration details. The condition for this is that the transport company has agreed with Customs to supply the details.

From the dropdown menu, choose the trader that gave you the ID, and click on “Apply”. Please note that to provide the arrival ID you can’t copy an earlier declaration or use a template. You have to start lodging a declaration by clicking on “+ New”.
If you don’t have an arrival ID or a tracking ID, you can also start completing a customs declaration without the ID.
Import declaration for low-value goods (customs procedure 4000)
When you have chosen the customs procedure “4000 – Release for free circulation without previous customs procedure”, select whether the value of your consignment is no more than 150 euros (a low-value consignment) or over 150 euros.
After this, select whether your goods are subject to restrictions or excise duty or not.
Release for free circulation (customs procedures codes 07, 40, 42, 45, 61, 63, 68): standard
declaration, simplified declaration and presentation notification
If you are lodging an import declaration for release for free circulation or e.g. a recapitulative statement for customers with a tax border numberchoose the customs procedure 40 by clicking on “40 – Release for free circulation”.
If you are lodging a re-import declaration click on “61 – Re-import and release for free circulation”. You can choose the other customs procedures for release for free circulation, 07, 42, 63 and 68 in the drop-down menu “Special procedures and other customs procedures”.

Next, in the section “Start to lodge a declaration”, provide the arrival ID or tracking ID. If there isn’t one, it doesn’t need to be provided.
Next, choose the declaration you wish to lodge. Choose standard customs declaration, simplified declaration or presentation notification.
If you are providing all details concerning the consignment in one standard declaration, click on “Standard customs declaration” (FI415A). If you are lodging a simplified declaration where some details are missing or where some of the provided details are estimates, click on “Simplified declaration” (FI415A). In that case, you must provide the missing and exact details later using a supplementary customs declaration. If you have an authorisation for entry in the declarant's records, click on “Presentation notification” (FI475A). In that case, you must lodge a supplementary customs declaration later.
If you don’t want to lodge a declaration, but create a template for later use, tick the box “I do not want to send a declaration now but I want to made a template for later use” before choosing the customs declaration. Then you can start creating a template by clicking on the appropriate declaration. (For more information on templates, see the sections “Declaration lists” and “Summary and submission”).
Customs declarations for special procedures (customs procedure 44, 46, 48, 51 or 53)
When you are lodging a customs declaration for a special procedure, you can choose the appropriate procedure in the drop-down menu under “Special procedures and other customs procedures”.
After choosing the customs procedure, choose whether you have a written authorisation granted by the Customs Authorisation Centre or whether you are applying for an authorisation with a customs declaration. If applying for an authorisation with a customs declaration, you can only choose the standard customs declaration. If you have a written authorisation granted by the Customs Authorisation Centre, choose standard customs declaration, simplified declaration or presentation notification.
If you provided the number of the written authorisation granted by the Customs Authorisation Centre, you should also provide the authorisation holder’s EORI number. The format of the authorisation number can be e.g FIIPOLxxxxx.
Supplementary import declaration
When you have chosen “Supplementary customs declaration” as the import declaration type, a list opens with all your declarations for which a supplementary customs declaration has not yet been lodged.

From the list, choose the customs declaration(s) for which you wish to lodge a supplementary declaration. If you cannot find the declaration on the list, you can use search filters.
If you are lodging a supplementary customs declaration for one simplified customs declaration or for a presentation notification, click on the button with the “right arrow” icon in the second-to-last column of the declaration row.
If you are lodging a supplementary recapitulative customs declaration for more than one simplified customs declaration or for presentation notification, click first on the tree view icon in the last column of one declaration row. Then tick the boxes for all declarations covered by the recapitulative customs declarations.
Click “Start” to start lodging the supplementary declaration.
If you have an authorisation for entry in the declarant's records (EIR authorisation) and you are lodging a supplementary EIDR declaration for which a presentation notification has not been lodged, click on “The declaration is not on the list. I have a presentation notification waiver (EIDR).” Then choose the procedure for which you are wish to lodge a declaration.
Åland tax border declarations
When you are lodging an Åland tax border declaration, i.e. a customs declarations concerning goods traffic between Åland and mainland Finland or for goods imported from another EU country to Åland, start by clicking on “Import”. Then choose “Customs declaration” as the declaration type.
You can lodge either a national tax border declaration or an intra-EU tax border declaration. Choose the country of dispatch accordingly:
- If you are lodging a customs declaration concerning goods traffic between Åland and mainland Finland, select Finland as the original country of dispatch. You will then be directed to fill in a national tax border declaration.
- If you are lodging a customs declaration for goods imported from another EU country to Åland, select that EU country as the original country of dispatch. You will then be directed to fill in a tax border declaration for goods imported from another EU country.
Select the customs procedure from the displayed alternatives:
- In the national tax border declaration, choose either “40 – Release for free circulation” or “61 – Re-import and release for free circulation” as the customs procedure. If you are placing goods transported between Åland and mainland Finland under the inward processing or temporary admission procedure, choose 40 as the customs procedure. If you are re-importing goods after inward processing or temporary admission, choose 61 as the customs procedure. The additional information required for special procedures will be submitted for them later.
- In the intra-EU tax border declaration, you can choose “40 – Release for free circulation” or “61 – Re-import and release for free circulation” as the customs procedure. From the drop-down menu “Special procedures and other customs procedures”, you can also choose ”51 – Placing goods under inward processing procedure” or ”53 – Placing of goods under temporary admission” as the customs procedure.
In the national tax border declaration, the arrival ID provided by the transport company is not used.
To finish off, choose whether you wish to submit a standard customs declaration or a recapitulative statement for customers with a tax border number.
- Choose the standard customs declaration by clicking on “Customs declaration”.
- Choose the recapitulative statement for customers with a tax border number by clicking on “Recapitulative statement” if your business has a tax border number and you are submitting a recapitulative statement for goods transported across the Åland tax border.
Please note that clicking on “Close” will delete all the choices you have made and you will return to the front page of the service.
Discharge notification
Choose “Submit discharge notification” and choose the customs procedure for which you are submitting the notification. If you are discharging the procedure 44, 51 or 53, you can choose the procedure directly by clicking on the button for the procedure. If you are discharging the procedure 46 or 48, you can choose the procedure from the drop-down menu under “Other special procedures”. The chosen procedure cannot be changed later. Instead, you have to start completing the notification all over again.
A bill of discharge or notification of discharge can be submitted in the Customs Clearance Service, even if the declaration had been submitted via message exchange when the goods were placed under a special procedure. You can, at the same time, submit discharge details for several different customs declarations to be discharged that are related to the same written authorisation granted by the Authorisation Centre for the use of the special procedure.
The details provided in the notifcation cannot be changed after submission. You can, however, add a new details, such as an additional document. The notification can be withdrawn after submission.
Export declarations
When you have chosen “Export”, you’ll have to specify what kind of declaration you wish to lodge.
Choosing the type of export declaration
First, choose type of export declaration:
- Choose “Original declaration” when you want to lodge a standard customs declaration, a re-export declaration, a declaration for special procedures, a simplified customs declaration or a ship supply declaration. Choose this also if you are lodging a declaration after a fallback procedure.
- Choose “Supplementary declaration” when you wish to supplement a simplified declaration you have submitted earlier (additional declaration type C or F). The additional declaration type for the supplementary declaration is Y.
- Choose “Retrospective lodgement of a declaration”, when you are lodging an export declaration for goods in pipelines. Choose this also when you are lodging a standard customs declaration for undeclared goods after the goods have already exited the EU.
Providing the country of destination
Select the country or territory of destination from the drop-down menu. As the country of destination, provide the country to which the goods will be delivered. Select “QS” if you are lodging a declaration for ship and aircraft supplies. A ship supply declaration is submitted if the goods are delivered to a vessel or aircraft at a Finnish port or airport. When you have selected the country of destination, move away from the field “Country of destination”.
Selecting the requested procedure
Select “10 – Permanent export”, if the goods are not intended to be re-imported.
Select “11” if the inward processing procedure begins with export of equivalent goods. After this, provide the number of the authorisation granted by the Customs Authorisation Centre.
Select “21 – Outward processing”, if you temporarily export Union goods from the customs territory of the Union e.g. for manufacture or repair and when the customs duty levied on the goods upon re-import is higher than 0%. If you have an authorisation for outward processing granted by the Customs Authorisation Centre, provide the authorisation number. If you do not have an authorisation, select “I do not have an authorisation granted by the Customs Authorisation Centre”, in which case you are applying for an authorisation with this customs declaration.
Select “22 – Temporary export other than…”, if you export Union goods for manufacture or repair, processing or other handling and when the customs duty levied on the goods upon re-import is higher than 0%.
Select “23 – Temporary export” if you export e.g. tools for professional use or goods e.g. for an exhibition or as samples. The goods must be returned in the same state in which they were exported.
Select “3151”, if you are lodging a re-export declaration for goods that have been placed under the inward processing procedure.
Select “3153”, if you are lodging a re-export declaration for goods that have been placed under the temporary admission procedure.
Select “3171”, if you are lodging a re-export declaration for goods that have been placed under the customs warehousing procedure.
Note that you cannot change this choice later when you are completing the declaration.
When you have provide QS as the country of destination, you can choose the requested procedure. Select 1000 (permanent export), 1040 (permanent export preceded by release for free circulation) or 3171 (re-export from customs warehouse).
.png/4aad2081-6bc0-4bba-b031-04d1497a276b?t=1749134562874)
Ship supply declaration:
When you have provide QS as the country of destination, you can choose the requested procedure. Select 1000 (permanent export), 1040 (permanent export preceded by release for free circulation) or 3171 (re-export from customs warehouse).

Start lodging the declaration by selecting “FI515A – Standard customs declaration and Standard customs declaration for ship supplies to a non-Finnish port or airport” if the goods are delivered to a vessel or aircraft in another EU country, or “FI585 – Ship supply declaration for goods delivered to a vessel or aircraft at a Finnish port or airport” if the goods are delivered to a vessel or aircraft at a Finnish port or airport. Then you move to the first page of the declaration you have chosen and can start completing the declaration.
If you don’t want to lodge a declaration, but create a template for later use, tick the box “I do not want to send a declaration now but I want to made a template for later use”. For more information on templates, see the sections “Declaration lists” and “Summary and submission”.
Customs warehousing declarations
When you have chosen “Customs warehousing”, the section “Start to lodge a declaration” is displayed. There are three alternatives with codes as headings. You can choose between a standard customs declaration, a presentation notification or a discharge notification. Start lodging a declaration by choosing the appropriate alternative (for more information about the alternatives, see below).
Please note that clicking on “Cancel” will delete all the choices you have made and you will return to the front page of the service.

Standard customs declaration (FI415A)
If you are lodging a customs warehousing declaration concerning your own warehouse or another authorisation holder’s warehouse, select the standard declaration. You can lodge a declaration
- upon presentation, that is, when the goods arrive in Finland or at your warehouse
- in advance, no more than 30 days prior to the arrival of goods, if you have the MRN of the declaration for the previous procedure.
Start lodging the declaration by clicking on “Customs declaration”.
If you don’t want to lodge a declaration, but create a template for later use, tick the box “I do not want to send a declaration now but I want to made a template for later use” first. Then you can start creating a template by clicking on “Customs declaration”. (For more information on templates, see the sections “Declaration lists” and “Summary and submission”).
Presentation notification concerning entry in the declarant's records (EIDR) (FI475A)
If you have the authorisation for entry in the declarant’s records and you have made an entry in the records concerning the goods that have arrived at the warehouse, choose the presentation notification.
Start lodging the declaration by clicking on “Presentation notification”.
If you don’t want to lodge a declaration, but create a template for later use, tick the box “I do not want to send a declaration now but I want to made a template for later use” first. Then you can start creating a template by clicking on “Presentation notification”. (For more information on templates, see the sections “Declaration lists” and “Summary and submission”).
Discharge notification for customs warehousing (FI488A)
If you are a customs warehousing authorisation holder or represent one, use the discharge notification to notify which customs warehousing declarations have been discharged e.g. with import clearance, transit or re-export. A discharge notification doesn’t discharge the customs warehousing procedure, it is just a notification concerning one or several customs warehousing declarations.
Start lodging the declaration by clicking on “Discharge notification”.
If you don’t want to lodge a declaration, but create a template for later use, tick the box “I do not want to send a declaration now but I want to made a template for later use” first. Then you can start creating a template by clicking on “Discharge notification”. (For more information on templates, see the sections “Declaration lists” and “Summary and submission”).
Transit declarations
When you have chosen “Transit”, you will have to specify what kind of declaration you want to lodge.
I am sending or receiving goods
First, choose what you want to do with the goods:
- Choose “I am placing goods under the transit procedure”, when you use T transit or TIR Carnet. Read the detailed on choosing the declaration below.
- Choose “Arrival at destination”, when you receive goods that have arrived under the transit procedure. You can start lodging the declaration by clicking on ”Arrival notification”.
Providing safety and security data
If you have chosen that you are lodging a transit declaration or a TIR Carnet declaration, choose if you also want to provide safety and security data with the declaration.
There are two alternatives:
- You do not provide any safety and security data with the declaration.
- In that case, the place of loading and the method of payment must not be provided.
- You provide safety and security data on exit with the declaration.
- The mandatory safety and security data include: place of loading, UCR or transport document, transport information at the border and routing countries.
The choice you make here will be shown automatically in the declaration and you cannot edit it later.
Choosing the transit type
As the transit type, choose either T transit or TIR Carnet.
Choosing the transport mode
Next, choose the transport mode.
The alternatives are:
- “Road transport”
- After this, you must choose between standard procedure or simplified procedure (authorisation for the status of authorised consignor).
- “Rail transport” or “Air transport”.
- After this, you must answer the question “Are you using the authorisation for reduced dataset?”. If you do not have this authorisation, choose “No”.
Some other mode of transport, which you have to choose from the alternatives in the drop-down menu.
Before you can start lodging the declaration, you must click on “Customs declaration”. Then you move to the first page of the declaration you have chosen and can start completing the declaration.
If you don’t want to lodge a declaration, but create a template for later use, tick the box “I do not want to send a declaration now but I want to made a template for later use”. (For more information on templates, see the sections “Declaration lists” and “Summary and submission”).
Entry declarations and temporary storage declarations
When you have chosen “Entry or a temporary storage”, you’ll have to choose under “What do you want to do with the goods?” which declaration you wish to lodge. The alternatives are:
- a presentation notification
- a temporary storage declaration pre-lodged or combined with a presentation notification as well as an unloading report for temporary storage
- declarations for movements between temporary storage facilities
Start lodging a declaration by choosing the appropriate alternative (for more information about the alternatives, see below).

Presentation notification
If a temporary storage declaration (FI337A) has been lodged for the goods and they have arrived in Finland and are available for inspection by Customs, choose under “What do you want to do with the goods” the alternative “Present them to Customs”. Choose “Present them to Customs” also if goods are transported between Åland and mainland Finland or from another EU country to Åland.
After this, the button “Presentation notification” (FI332A) will be displayed, and by clicking on it you can proceed to fill in the declaration.

Temporary storage declaration and unloading report
If the goods are arriving or have arrived by sea or air directly from another EU country, Norway or Switzerland at a temporary storage facility, choose under “What do you want to do with the goods” the alternative “Declare them for temporary storage”.
After this, three different alternatives will be displayed:
- If you are pre-lodging a temporary storage declaration, choose “Temporary storage declaration” (FI337A).
- If the goods have already arrived and you are lodging a combined temporary storage declaration and presentation notification, choose “Temporary storage declaration and presentation notification” (FI335A).
- If the goods have been unloaded into a temporary storage facility, and discrepancies have been discovered between the declared details and the goods unloaded into the storage facility, choose “Unloading report for temporary storage” (FI364A).
Proceed to fill in the declaration by clicking on “Temporary storage”, “Combined declaration” or “Unloading report”.

Moving goods between temporary storage facilities
If you are moving goods under temporary storage or if goods moved under temporary storage have arrived at your storage facility, choose under “What do you want to do with the goods” the alternative “Move them between temporary storage facilities”.
After this, three different alternatives will be displayed:
- If you are the operator of the dispatching storage facility and are lodging a notification of the intended movement, choose “Notification of the intended movement” (FI376A).
- If you are the operator of the dispatching storage facility and are lodging a notification of the finalization of the movement, choose “Notification of the finalization of the movement” (FI379A).
- If you are the operator of the receiving storage facility and are lodging a temporary storage declaration for the goods unloaded into the storage facility after the movement, choose “Temporary storage declaration after movement” (FI377A).
Proceed to fill in the declaration by clicking on “Intended movement”, “Finalization of the movement” or “Temporary storage”.

Exit declarations
When you have chosen "Exit", you´ll have to specify what kind of declaration you wish to lodge.

Choose one of the following:
- Choose “Arrival at exit” (FI507A) when you notify that the goods have arrived at the place of exit.
- Choose “Exit summary declaration” (FI615A) when you are submitting a declaration for exiting goods for which no customs declaration or re-export notification is submitted. Safety and security data is provided with the declaration unless they have already been provided with an export declaration or a transit declaration. The declaration is submitted for goods that have been in temporary storage for more than 14 days and that exit the EU.
- Select “Exit Notification” (FI590A) when you are notifying Customs of the time and place of exit and of the MRNs of the export declaration, exit summary declaration or re-export notification submitted for the exited goods. The notification is submitted no later than on the first working day following the departure of the means of transport.
- Select “Re-export notification” (FI570A) when you are lodging a notification for goods that have been in temporary storage for no more than 14 days and are re-exported from temporary storage directly outside the customs territory of the Union. Choose this also when the goods are transported by sea on a non-regular shipping service vessel and the destination is another EU country. Choose this also if the goods arrive at the place of exit under a transit procedure and the goods are loaded directly onto the means of transport and the transit procedure is discharged. A re-export notification cannot be submitted if there are changes to the country of destination or the trader details provided in the declaration for temporary storage (entry summary declaration, temporary storage declaration or transit declaration). In such a case, an exit summary declaration (FI615A) must be submitted.